Bows can be incredibly accurate, but they must be tuned properly to achieve this. One of the most important things an archer can do is paper tune a bow. While many shooters have heard of paper tuning, few people even know the basics of how to get started. Let’s go over how to properly prepare and paper tune your bow for increased accuracy.
What Is Paper Tuning?
In order to achieve ideal accuracy with a bow, you want your arrows to shoot as straight as possible. Paper tuning helps to determine whether or not your arrows are leaving the bow in a straight line or not. Thanks to paper tuning, you can also determine if your arrow rest, nocking point, and bowstring are all aligned with each other. It also helps identify if you’re shooting the proper arrows for your setup among others.
There are many different benefits to paper tuning a bow. You can more easily identify any potential problems that could be negatively affecting your accuracy. Once a problem has been identified, you can address it and try once again with a simple paper tune test.
Preparing to Paper Tune a Bow
Paper tuning a bow is fairly simple. However, you will need a few different items and some preparation before you can get started. To prepare a basic paper tuning setup, you need to do the following:
1. Build a Frame
The first thing you need is some sort of frame to firmly hold the paper in place. There are plenty of great options to buy, but it’s also easy to make a simple frame yourself at home. In fact, you probably already have the materials you need lying around the house or garage! A frame can be made out of things like wood, PVC pipe, or even cardboard.
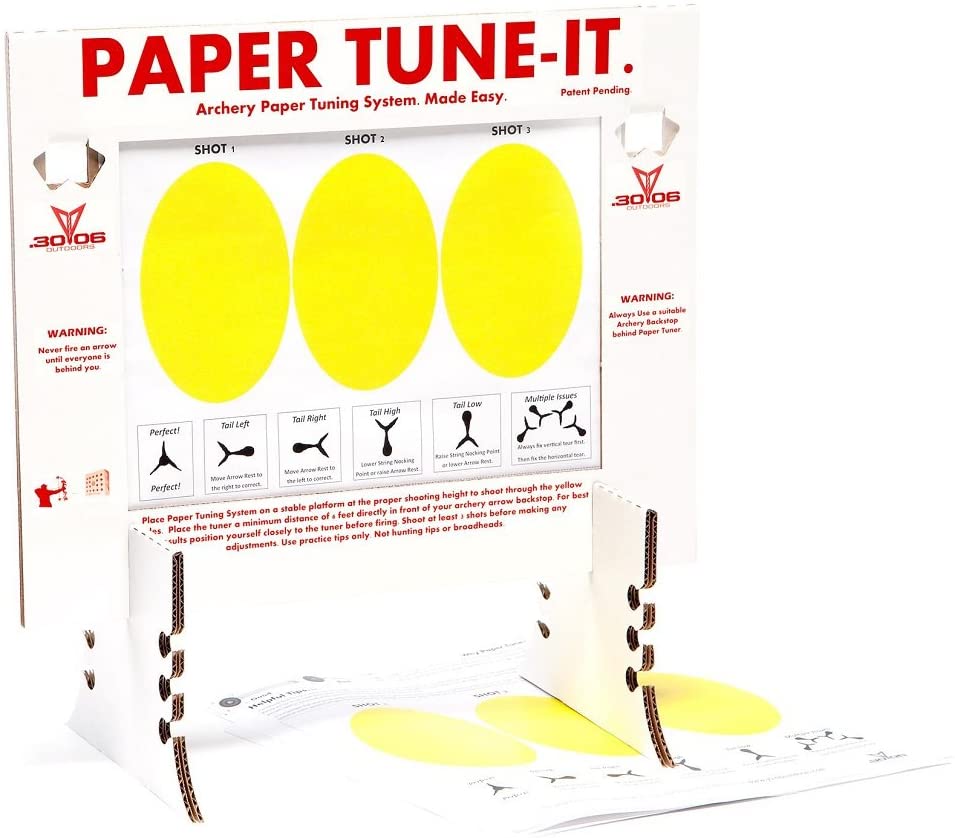
Using whatever material you have selected, make a frame similar to a picture frame. The center should be large enough to easily shoot an arrow through. It should stand perpendicular to the ground and solid enough so that it doesn’t easily tip over. If you’re looking for a quick and easy solution, the “Paper Tune-It” system works great.
2. Firmly Attach Paper
In the center of your frame, attach some paper. Again, there is specialty paper you can buy that is designed for this application but homemade options work just as well. Many shooters use paper such as butcher paper, printer paper, wax paper, or even newspaper. Regardless of what you use, the most important aspect of the paper is that it can easily tear and is not too tough. You want to be able to see even the slightest tears after you shoot an arrow through it.
It’s also important to firmly attach the paper and keep it tight while on the frame. This ensures you get the most accurate results from your arrow passing through it. You can attach the paper to the frame however you like, from paper clips, tape, binder clips, or whatever else you have on hand.
3. Set Up Your Target
Since you will be shooting through your frame, you are going to obviously need a backstop. Place your regular archery target directly behind the frame and paper so that after the arrow punches through the paper it will have a proper place to hit. Keep it at least a full arrow’s length behind the frame and paper so that the arrow can cleanly pass all the way through your paper tune set up before coming to a stop in the target.
4. Shooting an Arrow
Now that your paper tuning setup is finally complete, you can shoot an arrow through it and test it out. Stand in front of the paper tuning setup at a distance of six to eight feet away. Again, make sure your archery target is a few feet behind the paper in order to catch your arrow. Shoot straight through the paper and into the target, taking care to ensure you are facing it straight on and not shooting at any up or down angles.
5. Viewing the Results
After you shoot an arrow, take a look at the paper. The way the arrow tears a hole in the paper tells you what you need to know about the arrow’s flight and other potential issues with your archery setup. There are many different results that you can get (which we will cover down below) but if you want to run the test again, make sure you use a new sheet of paper or shoot a section of the paper that has no tears.
How To Paper Tune a Bow
Depending on how the tears in the paper look, you can determine what potential issues you may be facing. Here are the most common results, what they look like, and how to fix them.
Perfect Tear

This is what you are trying to accomplish with a paper tune test. A perfect tear will look more like a bullet hole in your paper with a few lines where the vanes punched through. You can easily see it went perfectly straight through the paper and is shooting very straight from your bow. Again, this is the end goal for any paper tune test and what you are aiming for.
High Tear

A high tear will have a larger hole and tear toward the bottom, meaning the back end of your arrow is hitting high. On your bow, your arrow is most likely pointed slightly down to create this issue. To remedy this, you can try moving your nock point down or lift your rest a little higher.
Low Tear

A low tear is the exact opposite of a high tear and will show as a larger hole towards the top of the rips in the paper. This means the front of your arrow is slightly higher while the backend is lower, resulting in the arrow not hitting the target straight on. To solve this issue, you can also do the opposite of a high tear and move your nocking point up or adjust your arrow rest down a hair.
Left Tear

A left tear in the paper will appear as a large hole on the right side of the impact area with two smaller rips from the vanes on the left side. This means that your arrow is skewing to the right, with the back end pushing to the left to cause this type of tear. To combat it, you can try to move your arrow rest to the right.
This type of tear can also mean that your arrow spine is too weak, so switching to a stiffer spine or reducing your draw weight can also help. The weight of your arrow tips can also help compensate for this difference. A lighter arrow tip helps reduce arrow flexion and therefore stiffen the spine. If this still does not solve the issue, it could be a problem with your cams (when using a bow with two). When one cam is rotating faster than the other, it could result in paper tuning issues. If that is the case, you will like.y need a bow press. At this point, it may be easier to take it to a local shop and have them address the timing issue.
Right Tear

A right tear is the exact opposite of a left tear, with a bigger rip on the left side and the back end of the arrow skewing to the right. On your bow, this could mean that your arrow is pointed slightly to the left. To fix it, try moving your arrow rest to the left.
Similar to a left tear, this could be due to an arrow spine that is too stiff. Switching to a weaker spined arrow or increasing the draw weight can help solve this issue. You can also try increasing the weight of your arrow tips to weaken the spine. Again this could also be from a cam timing issue. Here, I’d recommend visiting a local archery shop and having them fix the timing on the cams.
Paper Tuning Tips
Paper Tune Or Bare Shaft?
Bare shaft tuning is where you shoot one arrow that is stripped of fletchings in order to identify any potential shooting or accuracy issues (just like paper tuning). Without fletchings, an arrow in flight will not be corrected as it flies and any minor imperfections with a bow or shooting form can be found. So should you use the paper tune method or bare shaft?
Both methods work great for finding and solving problems, but the paper tuning method is definitely much easier. It will also depend on what type of release you are using. If shooting with fingers, the bare shaft method is preferable. When shooting with a release, the paper tune method will be better. Whether you bare shaft or paper tune a bow, it will provide instant feedback for a proper tune.
Bow Interference
Sometimes paper tuning issues have nothing to do with the bow itself. Instead, it could result from the arrow making contact with the rest or other parts of the bow upon release. To test this, simply spray your fletchings with white aerosol foot powder before shooting it. If it is making contact with something, you can look for small lines of interference that will show up in the powder. Something as simple as rotating the nock on the arrow can help keep the fletchings properly aligned so that they do not make contact with anything as they leave the bow.
Form Consistency
Another common issue when learning to paper tune a bow is proper shooting form and achieving a consistent shot. If you are not using good form while shooting, you can easily get bad results on your paper. This may lead you to believe there is a problem with your bow or arrows when in fact it is just the way you are shooting it. Practice good, clean form and be consistent every time. This helps to minimize the human margin of error and give you the best possible results.
Final Thoughts
Paper tuning your bow may seem like a daunting task, but it can actually be quite fun and extremely helpful in identifying potential accuracy problems. You can quickly see how straight your arrows are flying and remedy the problem yourself to ensure you achieve the best flight possible!

0 Comments